Written by Simon Cooke in 2019
Fancy lower and stiffer suspension on your T5 or T6? Of course you do, Low Pro Coil-overs from Tux Auto Design are new to the market. We recently fitted a set and now have them on long term test.
You will need: Good selection of spanners / sockets, screwdrivers, hammer, axle stands
Difficulty rating: 3
Standard VW suspension is good to a certain extent, but if you use your T5 for work with heavy loads or fit a camper conversion, the chances are you won’t be quite so impressed. Fitting a decent set of coil-overs like the Low Pros will provide a firmer ride, with less body roll and have the added advantage of supplying a lower stance and who doesn’t want that? – well Swampers don’t, obviously. Tux Auto Design’s new Low Pro Coil-Overs are fully adjustable and they claim it drops the ride height from 30-80 mm on the front and 30-70 mm on the rear.
Fitting is not hard – assuming all the bolts can be undone – and the Low Pros are a direct replacement for the standard VW parts. To fit the front and rear parts of this kit takes a couple of hours. Usually we’d do our step by step features right up in the air to make life easier for the fitter and me the cameraman – but today we have done in on the ground – just to prove it can be done.
We fitted them to regular reader, Steve Redding’s new T5 project. He’s only owned it a week and has already changed the lights, the front panels and added those twenty-inch rims. His first thoughts on seeing his new Low Pros? “They look a really nice bit of kit, well made and solid and I’m looking forward to getting them fitted to my van.”
He fitted them on their lowest setting – and can’t see a good reason to ever adjust them again. Having fitted them he went and drove a few laps to get them to bed in. “I’ve just driven around our estate and there are some really bad roads around here and it felt good, a nice ride, but still with a bit of give in them,” reported Steve. And more importantly his Chihuahua will be delighted as he can now get in and out of the van without needing a helping hand! Fast forward 6 weeks when Steve has had time to get used to his new suspension and he reports that his initial positive experience still stands – they offer a firm but not too firm ride, a good low stance, although he’s encountered no problems with speed bumps, and he’s got no problem driving his T5 on a daily basis. And when I reveal the price to him he reckoned that they are an absolute bargain and something he’d certainly be recommending to his fellow VW enthusiasts.
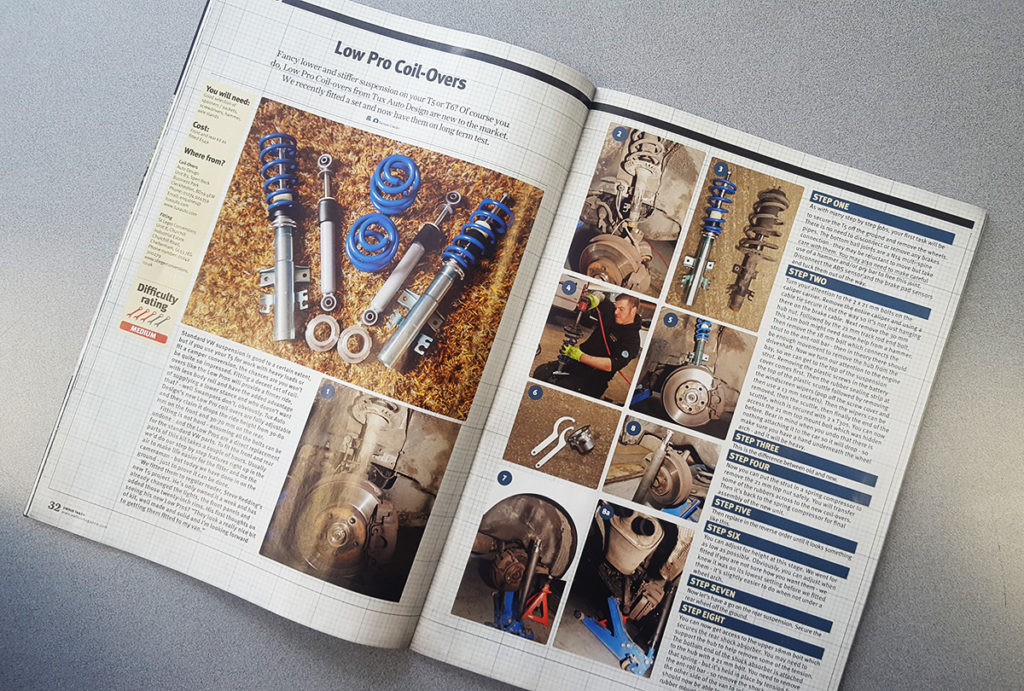
Step 1
As with many step by step jobs, your first task will be to secure the T5 off the ground and remove the wheels. There is no need to disconnect or remove any brakes pipes etc. The bottom ball joints are a N14 multi-spine connection – they may be reluctant to move but take care with them. You may also need to make careful use of a hammer and/or pry bar to free this joint. Disconnect the ABS sensor and the brake pad sensors and tuck them out of the way.
Step 2
Turn your attention to the 2 x 21 mm bolts on the caliper carrier. Remove the entire caliper and using a cable tie secure it out the way so it’s not just hanging there on the brake cable. Next remove the 30 mm hub nut. Followed by the 21 mm track rod end bolt. This 21m bolt might need some help from a hammer. Then remove the 18 mm bolt which connects the strut to the ant-roll bar – then in theory there should be enough movement to remove the hub from the driveshaft. Now we turn our attention to the engine bay, so we can get to the top of the suspension strut. Removing the plastic screws in the battery cover comes first. Then the rubber sealing strip at the top of the plastic scuttle followed by removing the windscreen wipers (pop off the screw cover and then use a 13 mm sockets). Then the wipers can be removed, then the scuttle, then finally the end of the scuttle, which is secured with 2 x T30s. You can now access the 21 mm top mount bolt which was hidden before. Bear in mind when you undo that there is nothing attaching it to the car so it will drop – so make sure you have a hand underneath the wheel arch – and it will be heavy.
Step 3
This is the difference between old and new. (see image at the bottom)
Step 4
Now you can put the strut in a spring compressor to remove the 21 mm top nut safely. You will transfer some of the rubbers across to the new coil-overs. Then it’s back to the spring compressor for final assembly of the new unit.
Step 5
Then replace in the reverse order until it looks something like this.
Step 6
You can adjust for height at this stage. We went for as low as possible. Obviously, you can adjust when fitted if you are not sure how you want them – we knew it was on its lowest setting before we fitted them – it’s slightly easier to do when not under a wheel arch.
Step 7
Now let’s have a go on the rear suspension. Secure the rear wheel off the ground.
Step 8
You can now get access to the upper 18mm bolt which secures the rear shock absorber. You may need to support the hub to help remove some of the tension. The bottom end of the shock absorber is attached to the hub with a 21 mm bolt. You need to remove that spring – but it’s held in place by tension from the ant-roll bar – so remove the shock absorber from the other side of the van to release that tension. You should now be able to remove both springs and their rubber mounts.
Step 9
Can you guess which are the new shocks and springs ?
Step 10
Assemble the new springs and locate them back in place, followed by the new dampers. Of course, you can adjust the ride height on the rear at this point – again we went for its lowest setting.
Step 11
These are the before and after photos, although ‘after’ is a relative term as they will undoubtedly settle after a few miles have been put on them.
We fitted the Low Pros on their lowest setting – and can’t see a good reason to ever adjust them again. Having fitted them Steve went and drove a few laps of the vicinity to get them to bed in and gave us his initial report. “I’ve just driven around our estate a few times and there are some really bad roads around here, it felt good, a nice ride, but still with a bit of give in them.” More importantly his Chihuahua will be delighted as he can now get in and out of the van without needing a helping hand!
We left Steve to get used to his latest modification and returned some six weeks later for an interim report. Now Steve has had time to get used to his new suspension he reported that his initial positive experience still stands – “they offer a firm, but not too firm ride, a good low stance, I’ve encountered no problems with speed bumps and I’ve got no problem driving my T5 on a daily basis. And when I revealed the price to him, £549, he reckoned they were an absolute bargain and something he’d certainly be recommending to his fellow VW enthusiasts.
We will be returning to Steve later in the year for a long-term test report.